Polaris PB4-60 Pump Volute Installation
Introduction to Polaris PB4-60 & the Role of the Volute
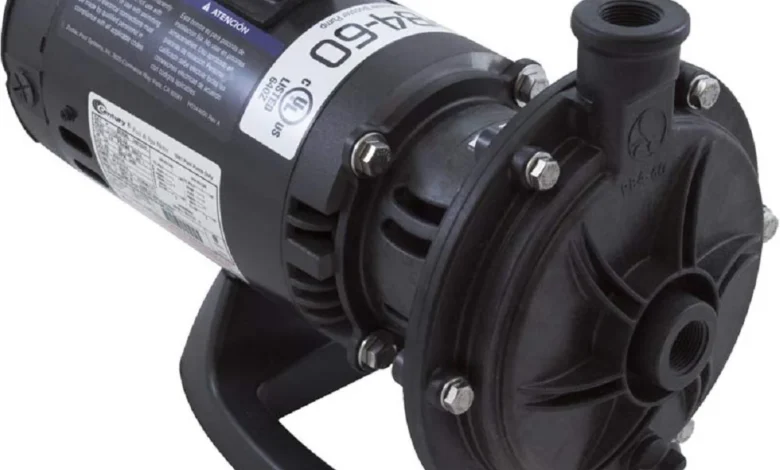
Polaris PB4-60 Pump Volute Installation: The Polaris PB4-60 is a booster pump commonly used in pool cleaning systems. Its design helps deliver pressurized water to power automatic pool cleaners or assist circulation. The volute (the spiral casing component) is critical: it directs water from the impeller outward into the discharge piping, converting velocity into pressure. Proper installation of the volute ensures efficient flow, prevents leaks, and avoids mechanical failures.
If the volute is misaligned, damaged, or improperly sealed, you may experience reduced pressure, leaks, vibration, or even motor damage. Therefore, following correct procedures during volute installation is essential to maintain pump life and performance.
This article walks through everything you need to know: preparing, removing old volute, installing the new one, plumbing, testing, maintenance, and troubleshooting.
Essential Tools, Parts & Preparations
Before beginning any work, you need the right tools, replacement parts, and safe conditions.
Tools & Materials
-
Socket wrenches (½″, 9⁄16″) and standard wrenches
-
Rubber mallet
-
Flat-head screwdriver
-
Silicone grease or lubricant (safe for O-rings and gaskets)
-
RTV sealant (if required by manufacturer)
-
Thread seal tape (PTFE) or sealant for plumbing connections
-
Torque wrench (to apply proper tightening without overdoing)
-
Inspection mirror / flashlight
Replacement Parts & Consumables
-
OEM volute (Polaris PB4-60 spec)
-
O-rings and gaskets (seal plate, volute gasket)
-
Shaft seal, if worn or required
-
Drain plug O-ring (if volute includes drain plug)
-
Silicone sealant / RTV for mating surfaces (check manual)
Preparations & Safety
-
Disconnect power: Ensure the pump is turned off and electrical supply disconnected.
-
Drain the pump housing: Remove any residual water to avoid spill and to allow safe removal.
-
Clear workspace: Lay towels or trays to catch small parts, bolts, or water.
-
Check the manual: According to Polaris’s official instructions, when volute rotation or removal is necessary, clean all RTV sealant from sealing surfaces and thoroughly dry components before reassembly.
-
Note bolt locations (especially different lengths) — for example, the top two motor bracket bolts may be shorter than bottom bolts
With everything laid out, you’re ready to remove the old volute.
Removing the Old Volute & Associated Components
Careful disassembly is crucial so as not to damage the impeller or housing.
Step 1: Remove Volute Face Plate Bolts
Use a ½″ socket or wrench to remove the six nuts/bolts holding the volute (face plate) to the motor bracket or seal plate. After removing them, gently pull the volute away from the pump housing. A rubber mallet may help if it’s stuck.
Step 2: Remove the Impeller (if needed)
You may need to remove the impeller to access seals or clean mating surfaces:
-
Access the motor shaft (there’s often a shaft access cap or cover on the motor rear)
-
Hold the shaft steady (with a screwdriver or wrench) and unscrew the impeller by turning counterclockwise (normal threading). You may need pliers, but use a rag to protect the impeller surface.
Step 3: Remove Motor Bracket & Shaft Seal
-
Remove the bolts holding the motor bracket to motor (often 4 bolts). Note the shorter vs longer bolts.
-
Carefully extract the spring (stainless steel) portion of the shaft seal from the bracket (tap it out gently).
-
Remove the porcelain / ceramic part of the seal from the impeller side, along with its rubber grommet O-ring
-
Clean the seal bore and check for wear or damage on bracket, impeller, or volute faces.
Step 4: Clean Sealing Surfaces
Any residual RTV or old sealant must be cleaned from sealing surfaces (volute, seal plate, motor bracket) before new installation. Ensure all mating faces are spotless, flat, and dry.
Only when surfaces are clean and dry should you proceed with new volute installation.
Installing the New Volute: Step-by-Step Guide
Now comes the critical process of installing the new volute correctly to ensure optimal performance.
Step 1: Install New Shaft Seal & O-rings
-
Place the porcelain / ceramic seal (the static half) into the impeller side. The rubber grommet / O-ring usually seats inside, with the white face outward. Use a bit of silicone grease or lubricant to help set it in place — avoid touching the face with bare fingers or contaminating with silicone.
-
Insert the spring / cup seal into the motor bracket, applying a small bead of RTV or silicone sealant on the lip or back side so it bonds properly (if recommended). Tap it gently until flush and secure.
-
Replace the shaft O-ring if present, lubricating it lightly to ease bracket reinstallation.
Step 2: Reattach Motor Bracket & Impeller
-
Reattach the motor bracket using its bolts. Ensure correct orientation (note the “V” or shape markings if present) and that the shorter bolts go on top
-
Thread the impeller back onto the shaft (clockwise). Again, hold the shaft steady and tighten — typically hand tight is sufficient (avoid overtightening).
Step 3: Position the Volute & Seal Plate O-ring
-
Apply a thin bead of RTV sealant around the sealing surface of the volute (about 1⁄8″ bead) — typically placed about ¼″ from the inner diameter.
-
Install the O-ring (or gasket) onto the volute or seal plate, without additional sealant on the O-ring itself, unless recommended.
-
Orient the volute in its correct alignment relative to plumbing ports or discharge direction.
Step 4: Bolt the Volute in Place
-
Slide the volute face plate onto the motor bracket, aligning bolt holes.
-
Insert the bolts/nuts loosely at first.
-
Use a cross-pattern tightening sequence (i.e. alternate bolts across the face) to draw the volute evenly, avoiding warping.
-
Tighten the bolts to specified torque (check Polaris manual) using a torque wrench — do not overtighten.
-
After tightening, manually rotate the impeller to confirm there’s no rubbing or obstruction.
Step 5: Reconnect Plumbing & Quick Connects
-
Slide union fittings or quick connects (Polaris Softube quick connects in many setups) back onto the inlet and discharge ports. Use thread sealant or PTFE tape on the threads as needed.
-
Then attach the flexible hose to the quick connect, push hose fully over barb, and snap the retainer clip into position.
-
Reestablish rigid or flexible supply plumbing as per system requirements.
Step 6: Prime & Test the Pump
-
Turn on the pool filtration pump first. The Polaris booster pump is not self-priming and depends on the filtration pump to supply flow.
-
Check for proper water flow from the supply line (you can disconnect the inlet briefly to test).
-
Power on the booster pump. Monitor gauge, flow, pressure, and listen for noise or vibration.
-
Inspect all seals and bolted connections for leaks, for at least 15 minutes of continuous operation.
-
If you detect leaks, shut down, recheck bolt torque, and reseal as needed.
Maintenance Tips & Long-Term Care
To keep the volute and pump functioning reliably over time:
-
Inspect volute interior periodically with flashlight or mirror for cracks, abrasion, or buildup.
-
Lubricate O-rings and gaskets with silicone grease every 6-12 months to prevent drying or cracking.
-
Clean impeller & volute if debris or scale starts building — perform during regular maintenance cycles.
-
Winterize the pump in cold climates: drain completely, disconnect plumbing, avoid freeze damage.
-
Keep a log of installation dates, torque values, observed leaks or vibration, which helps detect trends or wear early.
Troubleshooting Common Issues After Volute Installation
Even a careful installation may lead to challenges. Here’s how to tackle them:
| Symptom | Likely Cause | Remedy |
|---|---|---|
| Leak around volute / face plate | Misaligned gasket/O-ring, insufficient torque, debris on sealing surface | Shut off, retorque in cross pattern, reseat gasket, clean surfaces |
| Vibration or noise | Impeller rubbing volute or misalignment | Remove volute, check impeller clearance, reassemble carefully |
| Low pressure / reduced flow | Air ingress in suction side, blockage inside volute, improper priming | Check suction unions, purge air, inspect volute interior |
| Pump fails to start or stalls | Electrical issue, overloaded motor, tight impeller | Check wiring, voltage, and that impeller spins freely |
| Cavitation or noisy flow | High suction lift, air leaks, or undersized piping | Improve inlet plumbing (less bends), tighten unions, ensure proper water supply |
If persistent issues remain, consult a professional or service center, especially since mechanical seal or motor problems may be involved.
Conclusion
Installing a volute on the Polaris PB4-60 properly demands care, alignment, correct sealing, and methodical reassembly. With the proper tools, new seals, and careful steps — from disassembly to bolt pattern tightening — you can ensure efficient, leak-free operation. Regular maintenance, inspection, and troubleshooting help extend pump life and avoid downtime.